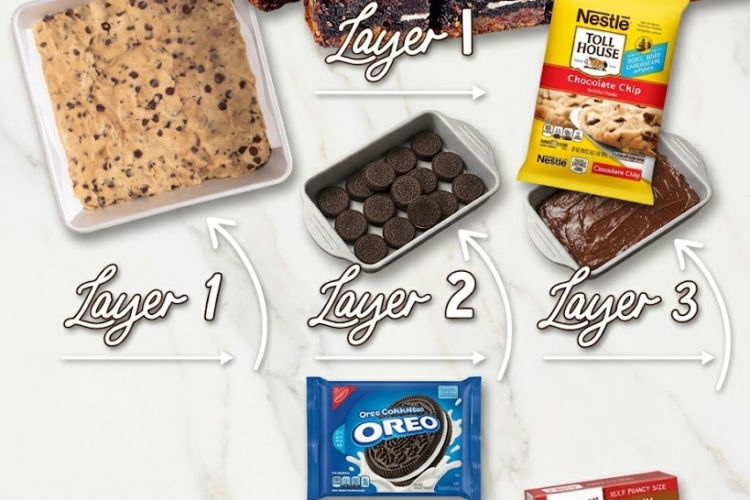
Slutty Brownies: The Ultimate Triple-Layer Dessert Architecture
A masterclass in textural contrast—stacking classic chocolate chip cookie dough, a crisp Oreo core, and a dense, fudgy brownie crown into a single, highly engineered square.
[ Jump to Recipe ] | [ Print Recipe ] | [ Pin for Later ] |
In the realm of high-impact bakery offerings, few items command attention quite like this triple-layer masterpiece. Often referred to colloquially as the “Slutty Brownie,” this dessert is a study in excess done perfectly right.
By leveraging high-quality pre-made doughs and mixes, this recipe minimizes active labor while maximizing yield and visual appeal. It is a staple for high-volume bake sales, catering events, and premium dessert portfolios.
🏗️ The Architecture of the Bake
Understanding the role of each layer is crucial to executing a flawless bake where all components set simultaneously without burning or remaining raw.
1. The Foundation: Chocolate Chip Cookie
The base provides structural integrity. Because cookie dough contains a higher ratio of flour and butter, it bakes into a sturdy, caramelized foundation that supports the heavier layers above it.
2. The Core: The Oreo Biscuit
The central layer acts as an insulating barrier. The intact cookies provide a distinct crunch that interrupts the chewy bottom and the fudgy top, elevating the sensory experience of the bite.
3. The Crown: The Fudgy Brownie
The liquid brownie batter seeps into the negative space between the Oreos, binding the entire structure together. Its high sugar and fat content ensures a glossy, crackly crust.
🛠️ Essential Equipment Needed
To achieve sharp, professional-grade slices, precise equipment is necessary:
- Pan: 8×8-inch or 9×9-inch heavy-gauge aluminum baking pan (distributes heat evenly).
- Lining: High-quality parchment paper (cut to form a “sling” for easy extraction).
- Spreader: Small offset spatula for an even brownie batter distribution.
- Slicing: A sharp, hot chef’s knife (wiped clean between every single cut).
⏱️ The Baker’s Timeline
| Phase | Action | Time Commitment |
| Phase 1 | Mise en place & Pan prep | 5 Minutes |
| Phase 2 | Layering & Assembly | 10 Minutes |
| Phase 3 | Oven Baking | 35 – 45 Minutes |
| Phase 4 | Structural Resting & Cooling | 2+ Hours (Critical) |
📖 Official Recipe Card
The Triple-Layer “Slutty” Brownie
Prep time: 15 minutes | Cook time: 35-45 minutes | Total time: 1 hour (plus cooling) | Yields: 16 generous squares
Ingredient Inventory
The Base:
- 16.5 ounces chocolate chip cookie dough (standard commercial tube or pre-made equivalent)
The Core:
- 20 classic Oreo cookies (Double Stuf may be used, but standard provides optimal structural integrity)
The Crown:
- 18 ounces premium brownie mix (1 standard commercial box)
- 1 to 2 large eggs (execute exactly as directed on your specific brownie mix package)
- ⅓ cup neutral vegetable oil
- ¼ cup filtered water
Step-by-Step Execution
Step 1: Oven & Pan Preparation
- Preheat the oven to 350°F (175°C).
- Lightly coat your square baking dish with non-stick spray, then line it tightly with parchment paper, allowing the edges to overhang on two sides to create a lifting sling.
Step 2: Establishing the Base Layer
- Extract the 16.5 ounces of chocolate chip cookie dough.
- Press it firmly and uniformly into the bottom of the prepared pan.
- Professional Tip: Use the flat bottom of a metal measuring cup to stamp the dough perfectly flat, preventing uneven baking zones.
Step 3: Engineering the Core
- Align the 20 Oreo cookies in a single, tight grid directly on top of the raw cookie base.
- Ensure the cookies touch edge-to-edge. If necessary, snap a few cookies in half to fill any perimeter gaps perfectly.
Step 4: Mixing the Crown
- In a large stainless-steel mixing bowl, combine the 18 ounces of brownie mix, eggs, ⅓ cup vegetable oil, and ¼ cup water (or follow the exact liquid ratios on your box).
- Fold gently with a silicone spatula until a homogenous, glossy batter forms. Do not overaerate.
Step 5: Final Assembly & Baking
- Pour the brownie batter directly into the center of the pan over the cookie grid.
- Use an offset spatula to gently push the batter into the corners, ensuring all cookies are completely submerged and sealed.
- Bake on the center rack for 35 to 45 minutes. The bake is complete when the perimeter is deeply set and a toothpick inserted into the absolute center emerges with heavy, moist crumbs (not liquid batter).
Step 6: The Cooling Protocol
- Remove the pan from the oven and transfer it immediately to a wire cooling rack.
- Do not attempt to slice. The residual heat will continue to bake and set the center. Allow the block to rest at room temperature for a minimum of 2 hours.
- Once fully cooled, use the parchment sling to extract the block onto a cutting board for portioning.
🧊 Storage & Preservation
- Ambient Storage: Store in an airtight container at room temperature for up to 4 days.
- Cold Storage: May be refrigerated for up to 7 days, which yields a denser, truffle-like texture.
- Freezing: Wrap individual squares tightly in plastic wrap, then foil. Freeze for up to 3 months. Thaw at room temperature.
📊 Standard Nutritional Profile (Per 1/16th Square)
| Metric | Amount | % Daily Value* |
| Calories | 350 kcal | – |
| Total Fat | 16 g | 21% |
| Total Carbohydrates | 48 g | 17% |
| Dietary Fiber | 2 g | 7% |
| Sugars | 32 g | – |
| Protein | 4 g | – |
| Sodium | 210 mg | 9% |
(Nutritional metrics are standardized estimates. Final values will shift slightly based on the exact commercial brands utilized for the base and crown layers).