Homemade Waffle Cone Recipe
Nothing completes a scoop of homemade ice cream quite like a freshly made waffle cone. Light, crispy, buttery, and filled with sweet vanilla flavor, homemade waffle cones are surprisingly easy to make with just a handful of pantry ingredients. Whether you’re serving classic vanilla, rich chocolate, fruity sorbet, or frozen yogurt, these crispy cones add the perfect finishing touch to your favorite frozen desserts.
Unlike store-bought cones, homemade waffle cones are warm, fragrant, and wonderfully crisp. They can be shaped into traditional cones, waffle bowls, dessert cups, or even rolled into cookies. Once you learn the technique, you’ll never want to buy packaged cones again.
This easy recipe requires only a few basic ingredients and can be made using either a waffle cone maker, pizzelle maker, or even a nonstick skillet for thin, delicate rounds.
Why You’ll Love This Recipe
Homemade waffle cones are a fun baking project that delivers bakery-quality results.
Here’s why you’ll love them:
- Crispy, buttery texture
- Delicious vanilla flavor
- Simple pantry ingredients
- Perfect for homemade ice cream
- Easy to shape into cones or bowls
- Better than store-bought cones
- Great for parties and summer desserts
- Ready in about 30 minutes
What Is a Waffle Cone?
A waffle cone is a thin, crisp cookie made from a lightly sweetened batter that is cooked until golden brown and then rolled into a cone while still warm. As it cools, the cone hardens into a sturdy shell that’s perfect for holding scoops of ice cream.
The same batter can also be shaped into waffle bowls, dessert cups, cookie rolls, or decorative garnishes for cakes and pastries.
Ingredients
- 2 large eggs
- ½ cup granulated sugar
- ½ cup all-purpose flour
- ¼ cup unsalted butter, melted
- ¼ cup whole milk
- ½ teaspoon vanilla extract
Ingredient Notes
Eggs
Eggs provide structure and help create the signature crisp texture.
Sugar
Granulated sugar sweetens the cones while helping them caramelize into a beautiful golden color.
All-Purpose Flour
Regular all-purpose flour gives the cones just the right balance of crispness and flexibility while they’re warm.
Butter
Melted butter adds rich flavor and helps produce a delicate, crisp cone.
Milk
Milk creates a smooth batter that’s easy to spread into thin rounds.
Vanilla Extract
Pure vanilla enhances the sweet, buttery flavor of the finished cones.
Equipment You’ll Need
- Waffle cone maker, waffle cone iron, or pizzelle maker
- Mixing bowls
- Whisk or electric hand mixer
- Measuring cups and spoons
- Rubber spatula
- Cone roller or clean kitchen towel for shaping
- Cooling rack
How to Make Homemade Waffle Cones
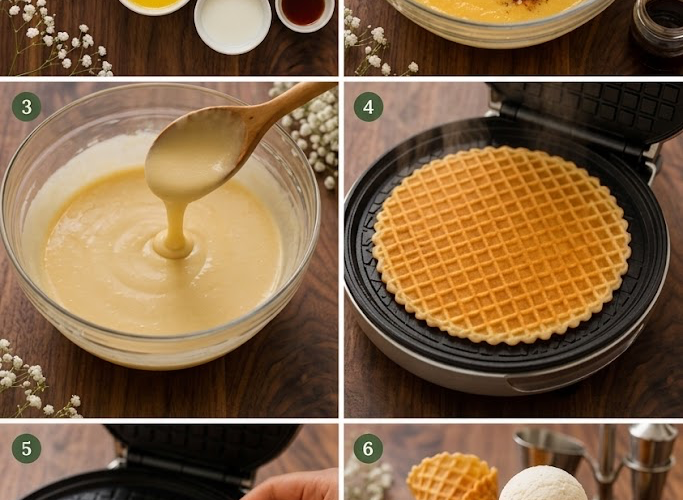
Step 1: Prepare the Batter
In a large mixing bowl, beat the eggs and granulated sugar together until the mixture becomes pale and slightly frothy.
Add the melted butter, milk, and vanilla extract. Whisk until fully combined.
Gradually stir in the flour until a smooth, lump-free batter forms. Avoid overmixing.
Allow the batter to rest for about 5 minutes while you preheat your waffle cone maker.
Step 2: Cook the Waffle Cones
Preheat the waffle cone maker according to the manufacturer’s instructions.
Lightly grease the plates if necessary.
Spoon a small amount of batter onto the center of the hot iron and close the lid.
Cook for approximately 1½–2½ minutes, or until the waffle is evenly golden brown and lightly crisp around the edges.
If using a skillet, spread a very thin layer of batter into a round shape and cook over medium heat until golden on both sides.
Step 3: Shape the Cones
Working quickly while the waffle is still hot and flexible, remove it from the iron and immediately wrap it around a waffle cone mold or roll it into a cone shape by hand.
Pinch the pointed end closed to prevent melted ice cream from dripping out.
Hold the cone in place for 15–20 seconds until it begins to firm up.
Step 4: Cool Completely
Place the shaped cone upright in a glass or cone stand and allow it to cool completely.
As it cools, the cone will become crisp and sturdy.
Repeat with the remaining batter.
Expert Tips for Perfect Waffle Cones
- Shape the cones immediately after cooking—they harden within seconds.
- If a cone becomes too firm before shaping, return it to the warm iron for a few seconds to soften it.
- Use a thin layer of batter for the crispiest cones.
- Avoid overcooking, which can make the cones bitter.
- Cool the cones completely before storing to maintain their crisp texture.
Flavor Variations
Customize your waffle cones with these delicious ideas:
Chocolate Waffle Cones
Replace 2 tablespoons of flour with unsweetened cocoa powder.
Cinnamon Sugar Cones
Add ½ teaspoon ground cinnamon to the batter.
Almond Waffle Cones
Replace the vanilla extract with almond extract for a subtle nutty flavor.
Chocolate-Dipped Cones
Dip the tops of cooled cones in melted dark, milk, or white chocolate.
Decorate with sprinkles, crushed cookies, chopped nuts, or toasted coconut before the chocolate sets.
Funfetti Cones
Fold colorful rainbow sprinkles into the batter for festive homemade cones.
Serving Suggestions
These homemade waffle cones pair beautifully with:
- Vanilla ice cream
- Chocolate ice cream
- Strawberry ice cream
- Mint chocolate chip
- Cookies and cream
- Salted caramel
- Pistachio
- Coffee ice cream
- Frozen yogurt
- Gelato
- Sorbet
- Soft serve
You can also fill them with whipped cream, fresh berries, mousse, pudding, or cheesecake filling for an elegant dessert.
Storage Instructions
Once completely cooled, store the waffle cones in an airtight container at room temperature for up to 1 week.
To help maintain crispness:
- Keep them away from moisture and humidity.
- Place parchment paper between layers if stacking.
- Avoid refrigerating, as this can soften the cones.
If the cones lose their crispness, warm them in a 300°F (150°C) oven for 2–3 minutes, then allow them to cool again.
Frequently Asked Questions
Can I make waffle cones without a waffle cone maker?
Yes. A pizzelle maker, thin waffle maker, or even a nonstick skillet can be used to cook thin rounds that can be shaped while hot.
Why did my waffle cones crack?
The cones were likely allowed to cool too much before shaping. Roll them immediately after cooking while they are still warm and flexible.
Can I make waffle bowls instead of cones?
Absolutely. Place the hot waffle over an upside-down bowl and gently shape it into a bowl before it cools.
Can I make the batter ahead of time?
Yes. The batter can be covered and refrigerated for up to 24 hours. Stir well before using.
Can I freeze waffle cones?
Freezing is not recommended, as moisture can affect their crisp texture after thawing.
Recipe Details
Yield: 8–10 waffle cones
Prep Time: 10 minutes
Cook Time: 15–20 minutes
Total Time: Approximately 30 minutes
Nutrition (Per Cone – Approximate)
- Calories: 115
- Carbohydrates: 15g
- Protein: 2g
- Fat: 5g
- Saturated Fat: 3g
- Cholesterol: 35mg
- Sodium: 25mg
- Sugar: 8g
- Fiber: 0g
Final Thoughts
Making Homemade Waffle Cones is easier than you might think, and the results are well worth the effort. Crisp, buttery, and delicately sweet, these cones elevate any scoop of ice cream into a bakery-worthy dessert. Whether you’re hosting a summer gathering, creating an ice cream bar for a party, or simply treating your family to homemade frozen desserts, these waffle cones add the perfect finishing touch. Once you’ve tasted a fresh homemade cone, you’ll never look at store-bought cones the same way again.